

Table of Contents
Whether you are a shop owner or a professional blogger, your image content is important. Beautiful, high quality images helps visitors remember your content and your website.
But if images are not used correctly, they can slow down your site. And if your website is slow, your visitors will grow impatient and leave.
If you would like to learn more about why it is important to have a fast website, check out this article from Google.
Cross-Site Content Copy Paste System for Divi, Gutenberg and Woo
Preparing images
There are several things you can do to improve your images before you upload them to your Divi website:
- Use the correct image format. JPG for photos. PNG for illustrations, shapes and photos with text. For icons, you can use a font or SVG.
- Resize the image to the size you are using on your website. Don’t resize images with CSS only, because the original image size will still be loaded.
- Compress your images. Image editors like Photoshop or Gimp can compress images to smaller sizes. There are also online services for image compression. One of them is kraken.io. The free tier of Kraken has a size limit of 1 MB.
Using Webcraftic Robin image optimizer with Divi
Robin Image Optimizer is a free plugin that can be downloaded from the WordPress.org plugin directory.
This plugin has been carefully tested with Divi. It can also save you time by optimizing your images on upload, or by schedule.
With this plugin you can optimize the following image formats: PNG, JPG, GIF, BMP and TIF. The premium version of the plugin has support for WebP images.
The size limitation for the images is 5 MB.
Getting started
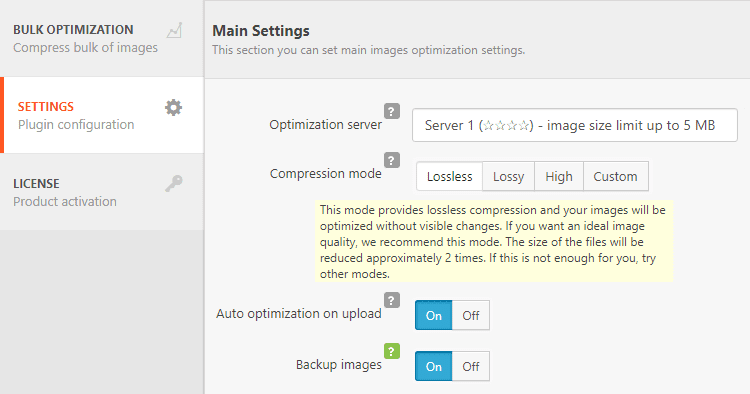
First, install and activate the plugin. Go to the WordPress admin area, Settings >Robin image optimizer > Settings.
Under Main Settings, you can activate auto optimization on upload.
It is important that you always keep a backup of your original images. This option is enabled by default.
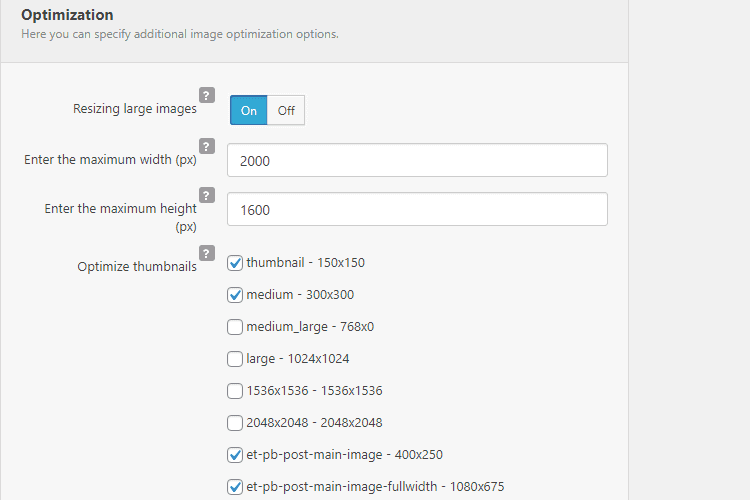
Under Optimization, you can choose to resize your images during the optimization process. This is a good option if you have not already set your images to the exact size you need.
When this option is enabled, you can set a maximum height and width for the resize.
When you scroll down to Optimize thumbnails, you will find a list of image sizes. Make sure that you check all boxes with the label et-name - size .
For example: et-pb-post-main-image - 400x250. These image sizes are used in Divi.
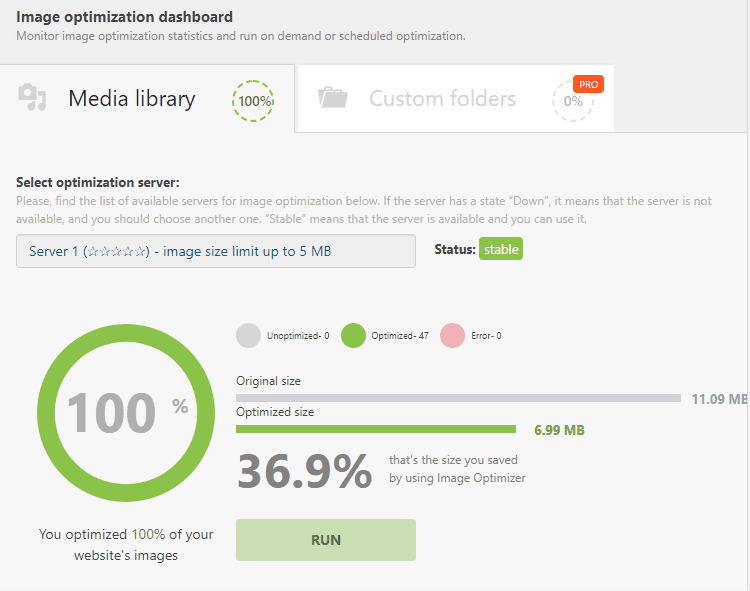
Save your settings before going to the next tab, Bulk Optimization.
It is recommended that you run the optimizer after installing the plugin. Select an available server from the list, and then click the Run button.
When the optimization is complete, the plugin shows statistics on how many files you optimized and the size you saved by optimizing:
Optimizing images in the editor - Step by Step
With the Robin image optimizer plugin you can also optimize images in your editor.
In this example, we have loaded a popular layout from the Divi library called Life Coach Landing Page. You can preview the template here.
This template features several large and impactful photos. Because of their size, we want to optimize them first.
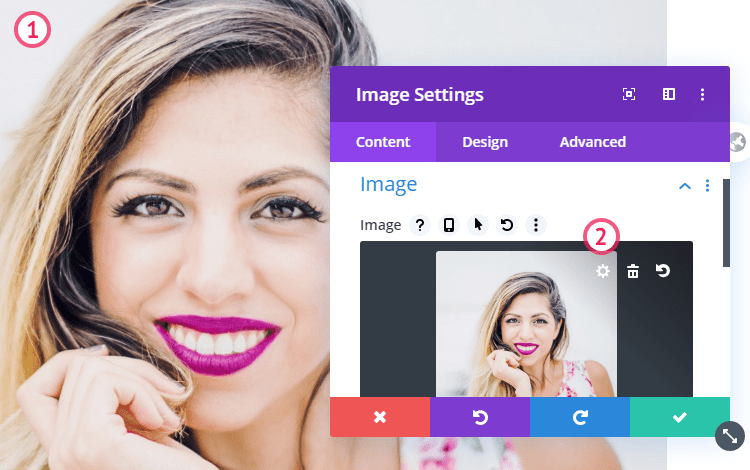
Select the background photo (1) in the left column of the header. In the module setting, select the image and click on the cogwheel to open the WordPress Media Library (2) :
Select the image (1). Use the sidebar on the right and scroll down to Image Optimizer (2):
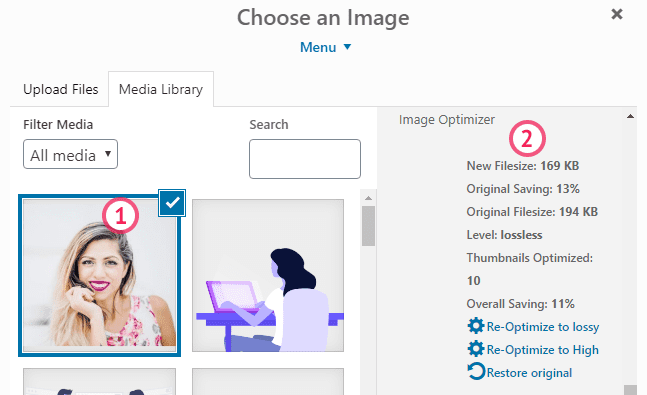
The sidebar displays information about the file size and how much you saved by optimizing the image during upload.
There are three options that can help you adjust the image quality. To re-optimize an image takes less than two seconds, and you can see the progress.
If an image is pixelated, you can use the options Restore Original, or Re-Optimize to High.
If the quality level is set to lossless , you can try to reduce the size further with the Re-Optimize to lossy option.
Optimization Results
With the help of the plugin and these quick steps we reduced the size of the header image by 13%.
By optimizing the remaining images in the template, our page loading speed was reduced from 3.9 to 3.2 seconds, according to Google Pagespeed.
After optimizing all images in our media library, we saved 38.5% on image sizes on our entire site.
Want to find out how much faster your own website can be?
Try this step by step guide and lets us know if it helped you by commenting below!
NEXT: Learn How to add SEO-friendly Testimonials in Divi >